

These Fluted Wall Decor Ideas explore how a change in texture can add more character to a space without filling every wall with artwork. The grooves might form a quiet backdrop, introduce a strong pattern, or become the main decorative feature themselves. Color and scale make a surprising difference.
Below, you’ll find ways to work fluting around furniture, shelves, mirrors, and doorways, along with a kitchen island that carries the texture beyond the wall. Each design offers something different to borrow, even if you’re only updating one part of a room.
Divide the Wall with Two-Tone Fluting
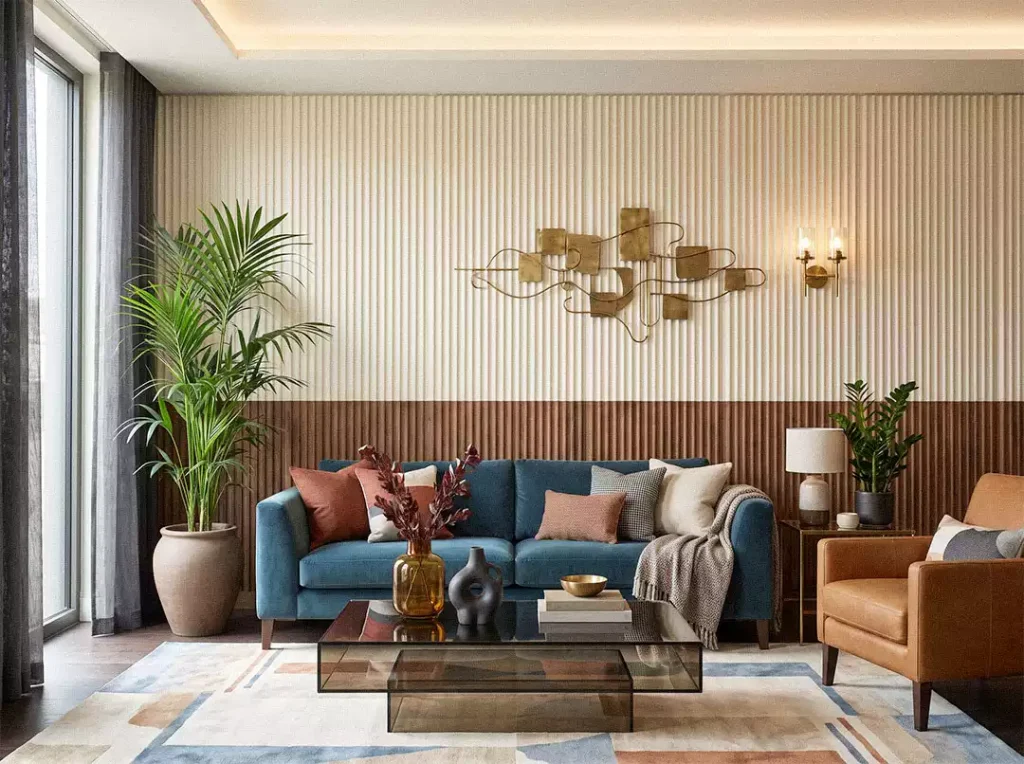
Ivory and brown fluted wall panels create two distinct bands behind this teal sofa. The grooves continue through the color change, so the surface still feels connected. Above, an open gold-toned sculpture stands out against the pale background without covering much of the texture.
Positioning the dividing line above the sofa back keeps both finishes visible. When planning a similar treatment, mark the proposed height with painter’s tape and view it from your usual seat and from the room’s entrance. A line that looks balanced on an empty wall may disappear once the furniture moves back.
Light the Gaps in a Charcoal Office Wall

Slender vertical lights break the charcoal paneling into sections, picking out the rounded edges of the dark ribs. The pale desk crosses those lines horizontally, giving the workspace a clear center beneath the full-height treatment.
There’s no need to squeeze artwork above the monitor here. The illuminated wall already supplies the detail, while a framed picture occupies the adjoining plain surface. That division gives each feature room: texture behind the desk and art beside it.
Keep Hallway Fluting Below the Artwork

Half-height sage paneling gives this hallway color while preserving a light upper wall for the mirror and architectural drawings. The matching top trim forms a continuous boundary along the passage. A narrow console with open space underneath allows the grooves to remain visible, rather than hiding them behind a solid cabinet. For a hallway, you still want to decorate with pictures; this arrangement leaves a useful stretch of plain wall above the texture.
Hang One Large Artwork over Warm Wood
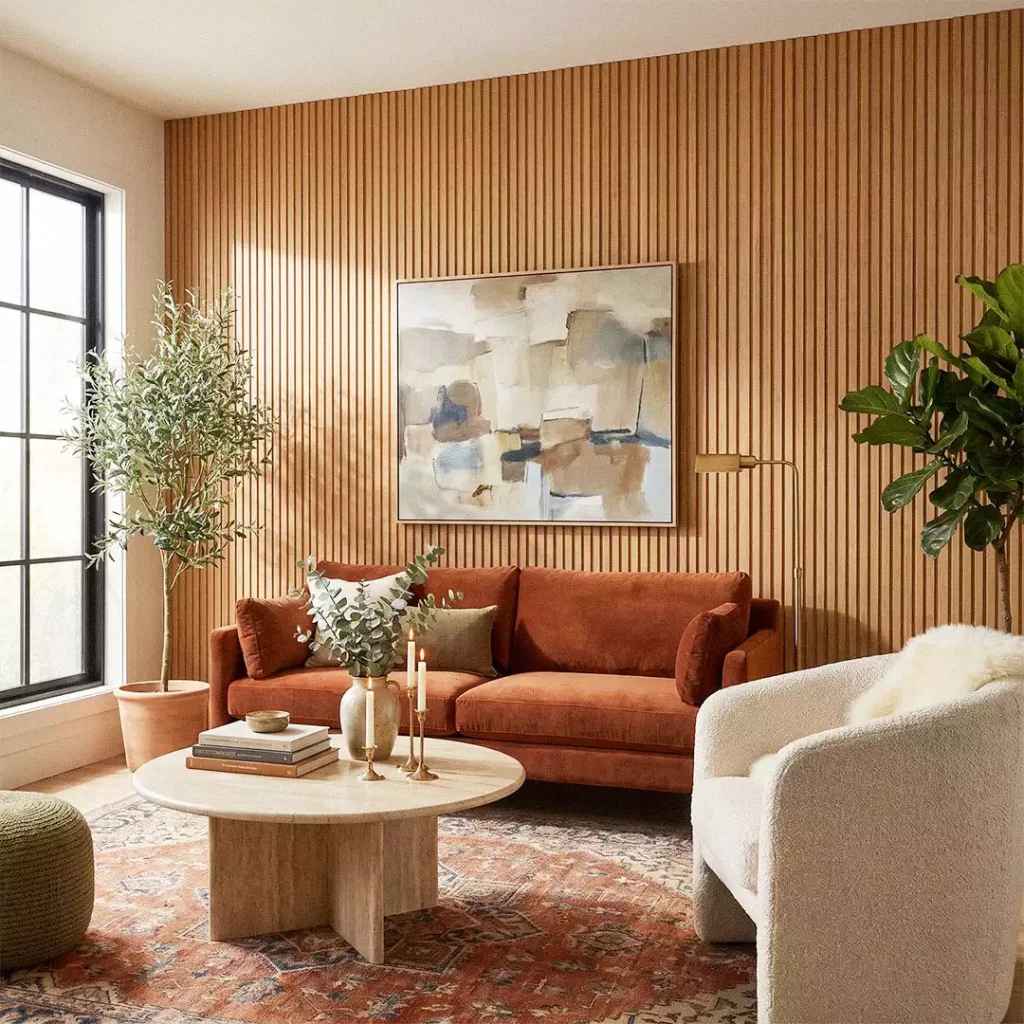
A wood fluted wall makes a richly textured backdrop for the rust sofa, but the large abstract painting holds its own. Broad patches of cream, gray, and muted blue give the eye something different from the closely repeated vertical lines.
Scale matters more than adding extra pieces. A single substantial painting can establish a focal point on a busy surface; several small frames would introduce more edges and gaps to an already detailed wall. Here, the painting sits comfortably within the sofa’s width, keeping the arrangement connected to the seating below.
Build a Display Around Three Arches
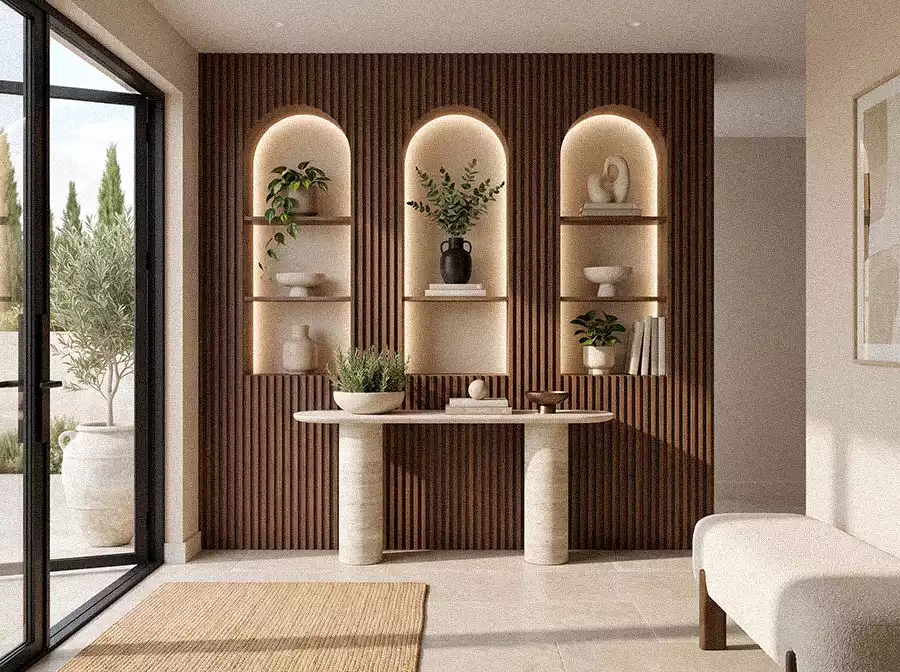
Three pale, illuminated niches interrupt the dark wood fluting in this entryway. Their rounded tops soften the wall’s repeated vertical lines, while the light interiors make the display objects easy to see.
The arches match, but the shelf arrangements don’t. Trailing greenery fills one upper compartment, branches rise from a dark vase in another, and a pale sculpture occupies the third. Repeating the structure provides order; changing the contents keeps the display from feeling copied three times.
Leave some shelf space unfilled when borrowing this idea. The empty areas are what let the curved outlines and lighting remain part of the decoration.
Soften a Bedroom with Curved Ivory Fluting
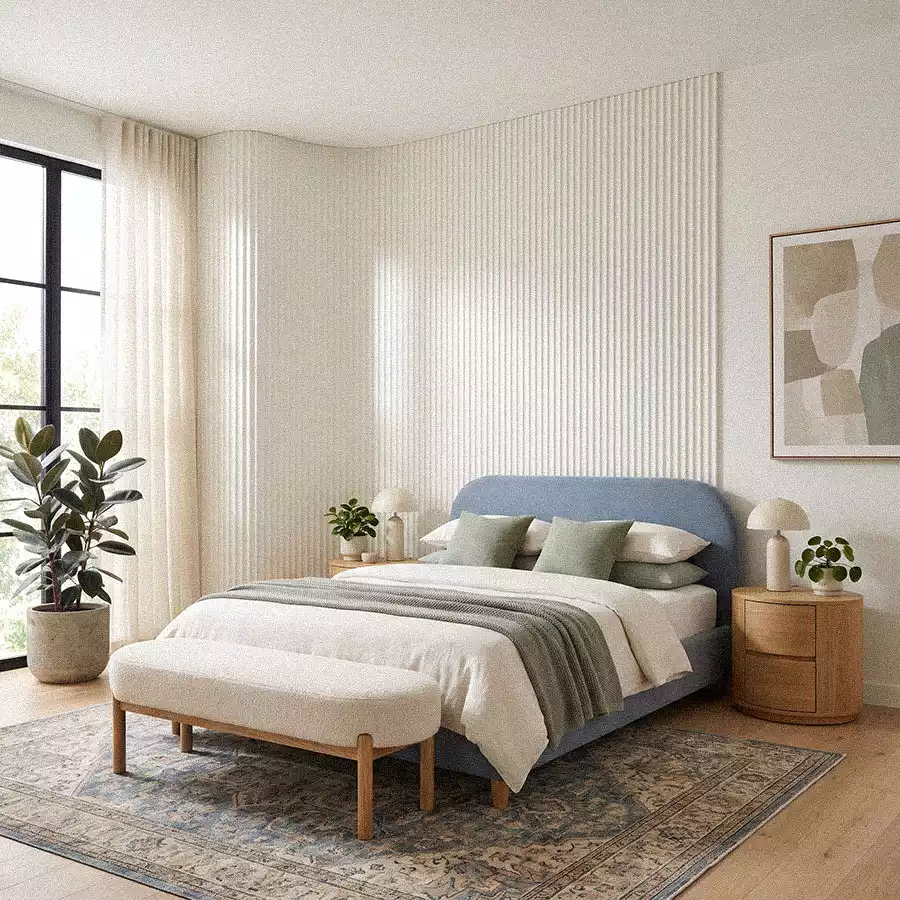
Fine ivory ridges follow the curved wall behind this blue upholstered bed. Because the paneling stays close in color to the surrounding walls, its shape emerges through light and shadow. The fluted wall texture remains gentle enough to sit alongside sage cushions and a softly patterned rug.
This is a useful approach when you want detail behind a headboard without introducing another strong color. Keep the paneling and neighboring paint close in tone, then let bedding provide the contrast. Here, the plain wall to the right also gives the framed artwork a separate place to sit.
Let a Sculptural Wave Cross the Wall

A broad wooden wave travels across vertical paneling in this dining room, with layered curves that rise and dip above the table. Lighting follows its outline, separating the sculptural feature from the straight grooves behind it. The fluted wall design becomes the room’s main artwork.
The table and white chairs leave much of that shape visible. With a feature this elaborate, plan its position around the furniture and pendant light together. The most interesting part of the curve should still be readable from the entrance and from a seated view.
Frame a Vanity with Stone-Looking Ridges
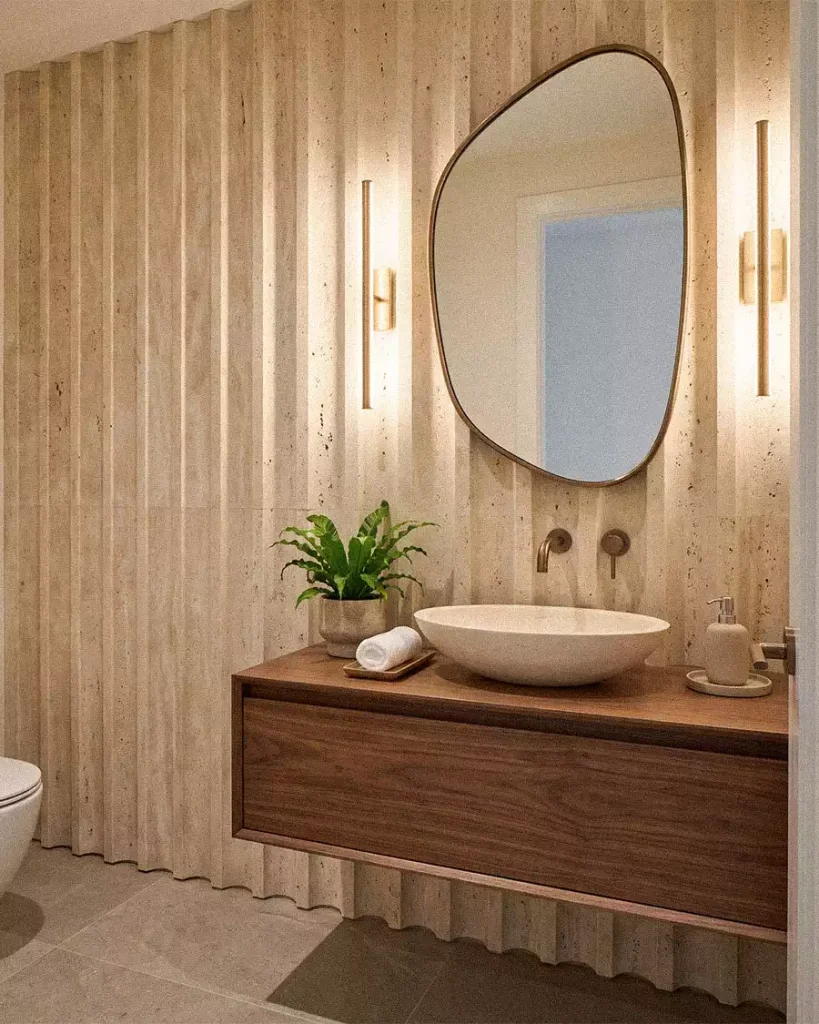
Pale stone-look flutes extend behind the floating vanity, continuing below the cabinet where their scalloped profile remains visible. That exposed lower section makes the wall treatment feel complete from top to bottom. Across it, the dark wooden vanity creates a strong horizontal break, while the irregular rounded mirror introduces a softer outline.
The countertop holds only a few small items, leaving the basin and textured backdrop clearly visible. In a compact vanity area, reducing the number of countertop accessories can give a detailed wall more breathing room without taking away its character.
Pair Navy Paneling with Floral Wallpaper

Navy fluting anchors the lower half of this reading corner, with floral wallpaper covering the wall above. The solid blue gives the small-scale pattern a clear boundary. A plum chair and mustard cushion pick up the richer colors in the floral artwork, tying the seating into the wall arrangement.
It’s a more layered, traditional interpretation of fluting. Books, framed art, and patterned textiles all belong here; the room doesn’t need to become minimal just because the paneling has regular lines.
For a similar combination, choose the panel color alongside the wallpaper sample. A deeper shade drawn from the print can connect the two surfaces while letting the flowers remain distinct.
Go Bigger with Broad Cream Flutes
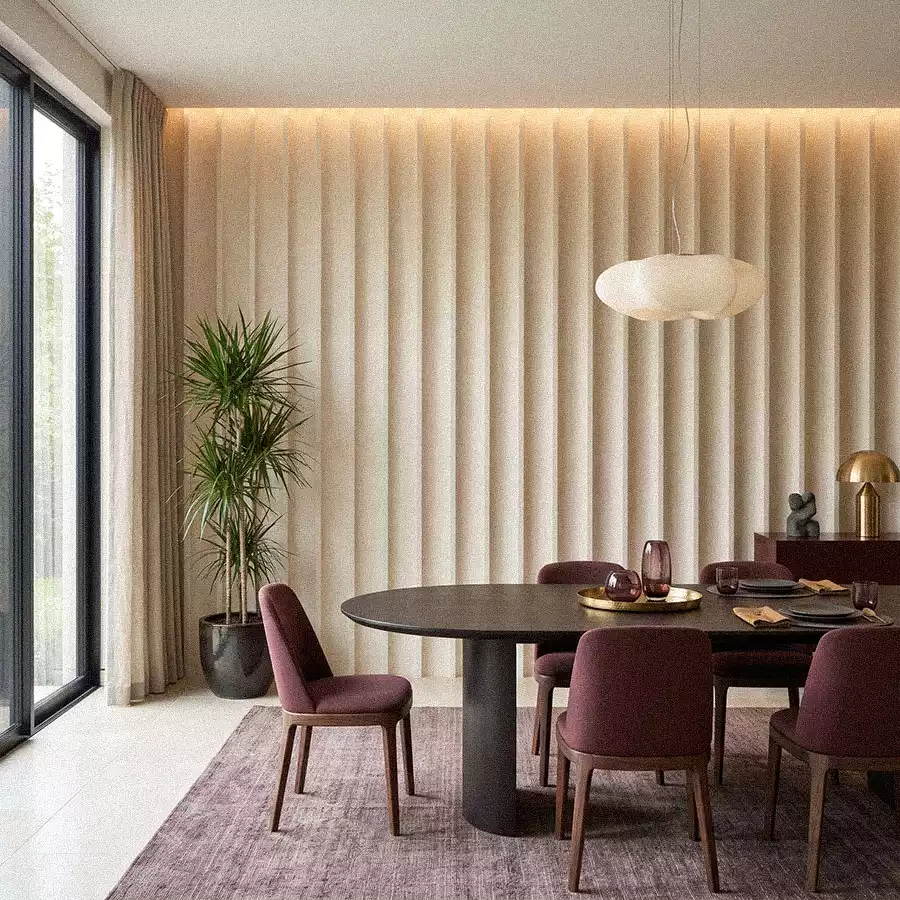
Broad cream flutes create generous bands of light and shadow across this dining room wall. Compared with closely spaced ribs, the larger curves give the surface a slower, less finely detailed pattern. Burgundy chairs stand out clearly against it, and the pale oval pendant echoes its rounded forms.
Groove width is worth comparing before choosing a panel style. Look at samples from across the room as well as close up: narrow ribs may read as an overall texture at a distance, while wider flutes keep their individual shapes. Here, those broad curves are the decoration, so the wall needs little else.
Blend a Door into an Olive Accent Wall
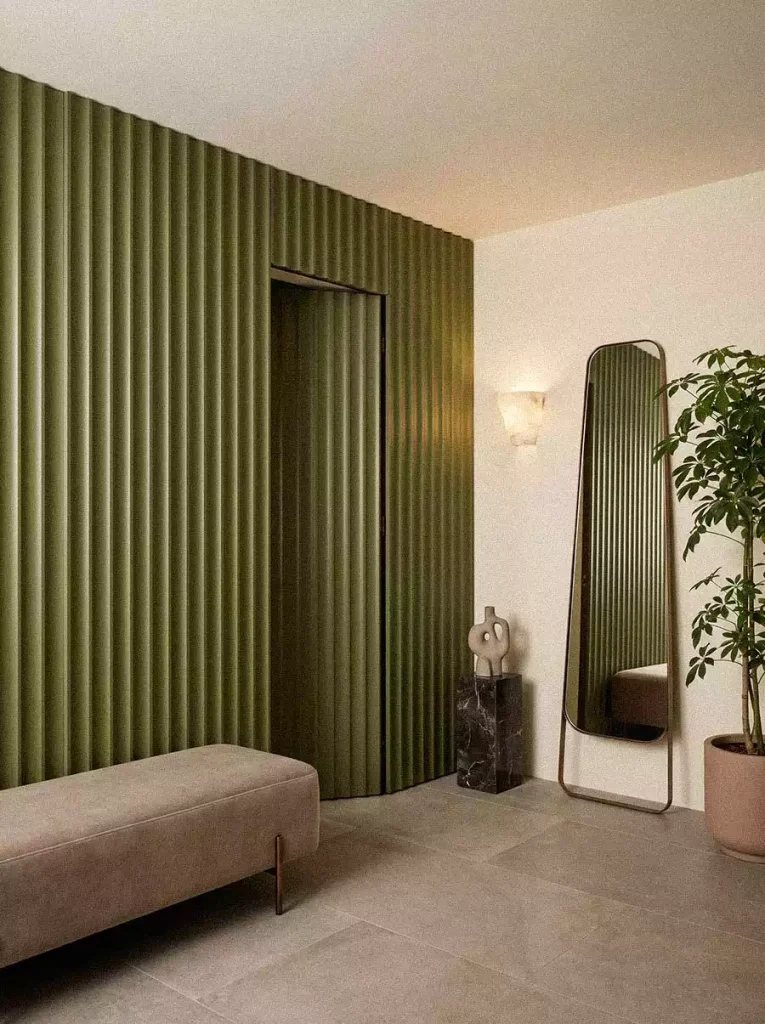
The door in this olive-green fluted accent wall shares the surrounding color and vertical pattern, making its outline less prominent. Its border is still visible, but it no longer reads as a large plain rectangle interrupting the texture. The low bench leaves most of the treatment exposed, and the tall mirror on the neighboring wall reflects another view of the grooves. For a doorway within a feature wall, coordinating the finish can help the whole surface feel more continuous.
Change Direction Behind the Bed

Diagonal wooden strips bring movement to the wall behind this forest-green bed. They rise across the room at an angle, while the two bedside pendants hang vertically in front of them. The difference in direction is enough to make the backdrop feel lively without adding artwork.
The broad upholstered headboard gives the eye a resting place within that pattern. When adapting diagonal paneling, consider the headboard as part of the composition: a simple, substantial shape can balance the many narrow lines behind it. Here, the dark bedside units also keep their outlines straightforward.
Alternate Grooved Panels with Smooth Sections
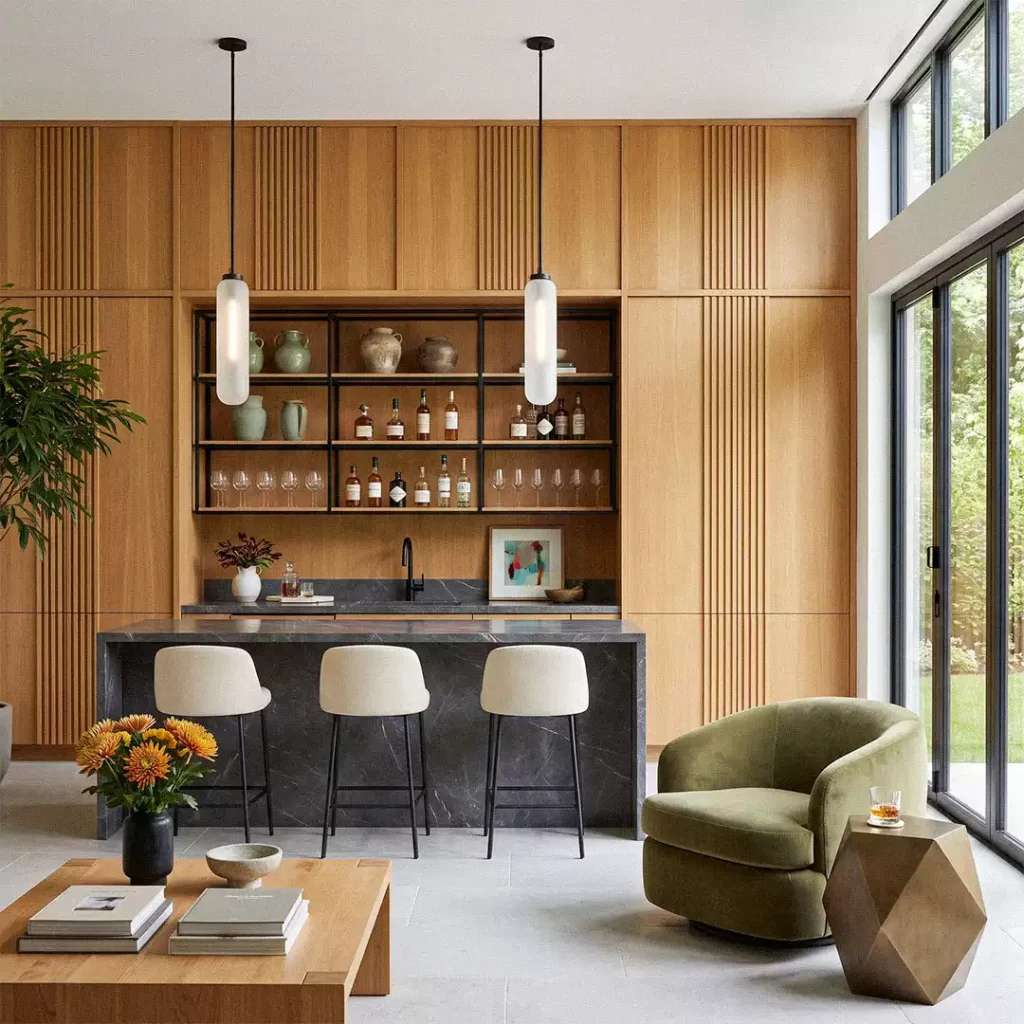
Around this home bar, groups of narrow grooves alternate with wider smooth wooden panels. Horizontal divisions add another layer of structure, framing the open shelves in the center. The wall has a rhythm of detailed and quiet sections rather than one unbroken ribbed surface.
This approach lets you use fluting selectively across a large area. Plan the textured sections around the main feature—in this case, the drinks shelving—so the pattern feels related to the room’s layout. The smooth panels give the bottles, glasses, and display pieces a less crowded setting.
Set Shelves into a Dark, Fluted Backdrop
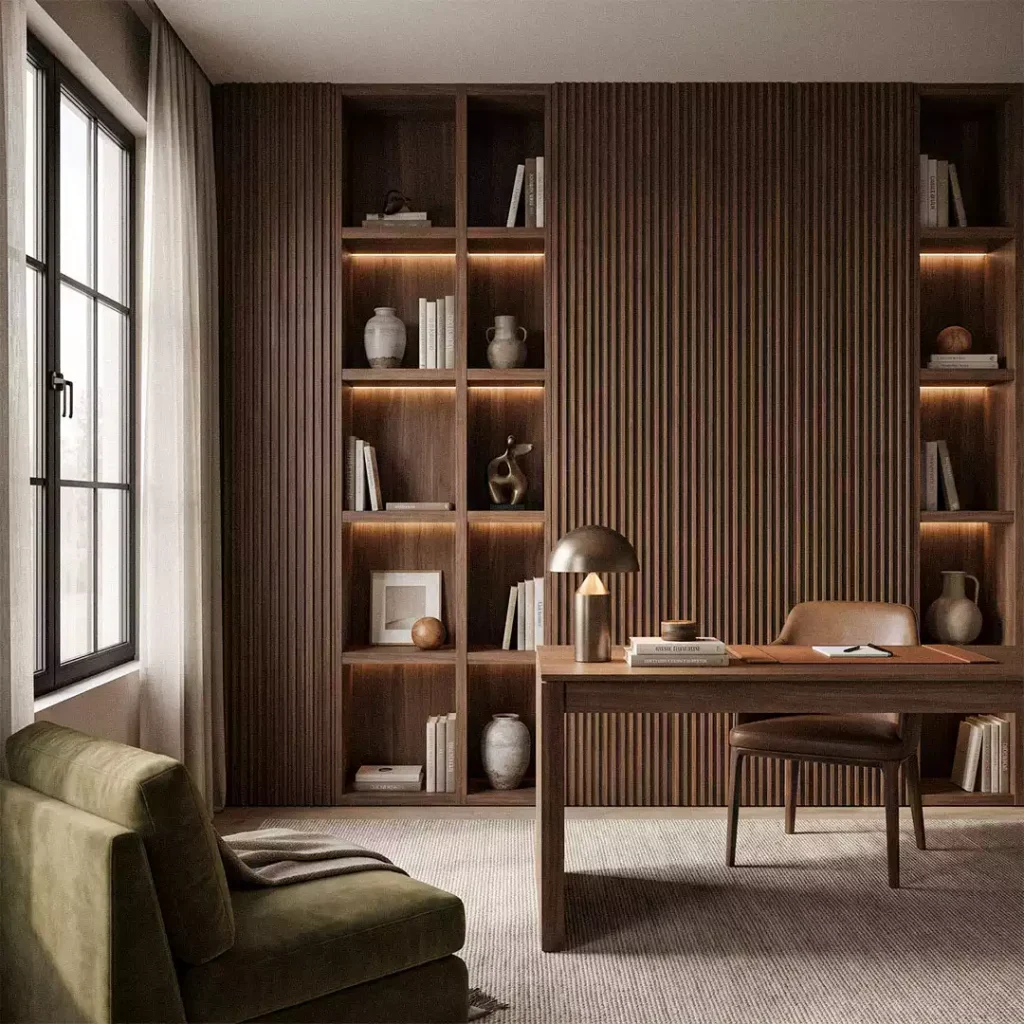
Dark brown paneling and tall open shelves share the back wall of this office. Their similar wood tones connect them, while the shelves’ rectangular compartments interrupt the fine vertical grooves. A broad textured section remains behind the desk.
The display gains variety from its contents: horizontal book stacks sit near upright volumes, and rounded pottery breaks up the straight shelf edges. Warm lighting beneath selected shelves draws attention into the compartments without lighting every part of the wall equally.
Keeping the central panel free of additional decoration gives the desk a quieter backdrop. The shelves can hold the smaller details around it.
Carry Fluted Texture onto the Kitchen Island
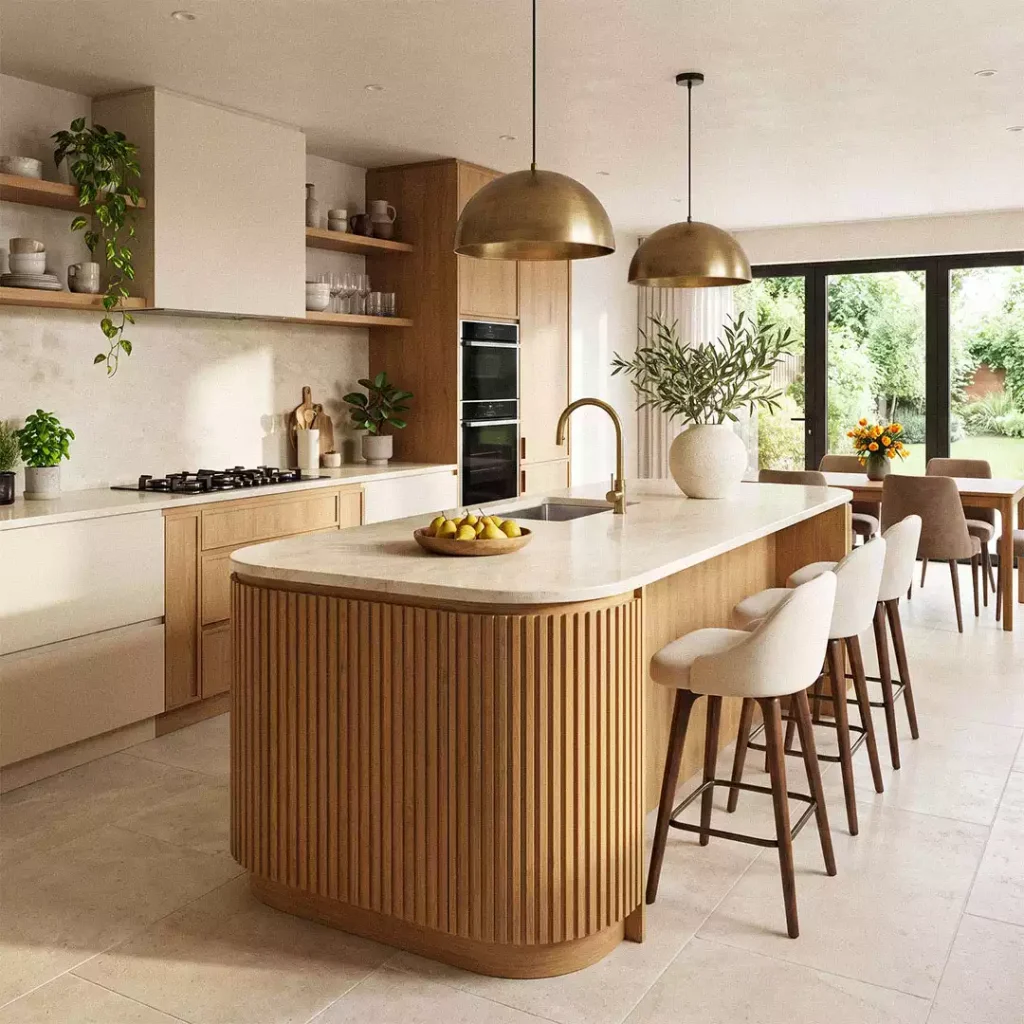
This idea takes fluting off the wall and applies it to the kitchen island instead. Narrow wooden ribs follow the rounded end beneath a pale countertop, giving the base a sculptural shape. Their golden-brown tone connects with the wooden cabinetry and open shelves behind it, repeating the color while introducing a different texture.
Keeping the surrounding surfaces mostly smooth gives the grooves space to stand out. Brass-toned dome pendants echo the island’s curves, while cream upholstered stools sit comfortably alongside the pale countertop. To adapt this approach, pair ribbed cladding with nearby wood finishes in a similar tone; the surfaces can feel connected without repeating fluting everywhere.
Give the Texture Room to Show
Think about how much of your chosen wall will remain visible once the furniture, mirrors, and artwork are in place. A beautiful panel pattern can lose its effect behind a tall cabinet, while a smaller exposed section may be enough beside a doorway or above a bench.
Borrow the detail that suits your room: a color division, a change in direction, or a few carefully placed grooves. Leaving some surfaces plain will give that choice space to be noticed.